The foremost thing you need to know about me, I am a heart and soul
bicyclist. From work to vacation, my bike is my partner for life. Some
of my friends call it my second wife. Well, it is more like my wife.
More often, it used to hurt when I took long rides. The seat structure
was so uncomfortable that I would often end up standing beside the road
for a while.
In the meantime, I also went through several articles and discovered
that normal seats are unhealthy. They damage our private parts. Now,
bikes might be my second wife, but it shouldn’t stop me from destroying
my future generation.
So, I went to the bike shops looking for some solutions. One
particular bike shop suggested me to consider a noseless bike seat. Now,
no nose bike seat was a very new alternative. I started researching
more on those noseless saddles. I discovered some of the amazing topics
online and wanted to write them down.
I often come across many riders who have given up biking just because
of these uncomfortable seats. I believe, after reading this article
you’ll also know more about the noseless bike saddle and will be able to
chose the best noseless bike seat for you.
5 Best Noseless Bike Seats
ISM PR 3.0 Noseless Saddle (Performance Recreational)
ISM Touring Noseless Bike Seat (For City)
ERGO The Seat by Lycra Gel Saddle (Hornless)
Hobson Easyseat II (Split Design)
Schwinn No Nose Saddle (Budget)
See the link below for detailed reviews.
Noseless Saddle Buying Guide
A saddle can create a tour to heaven or even be a nightmare in your
life. So, I prefer spending much more time studying different types of
saddles before buying one. Some of the key features that I would urge
you to consider are described below.
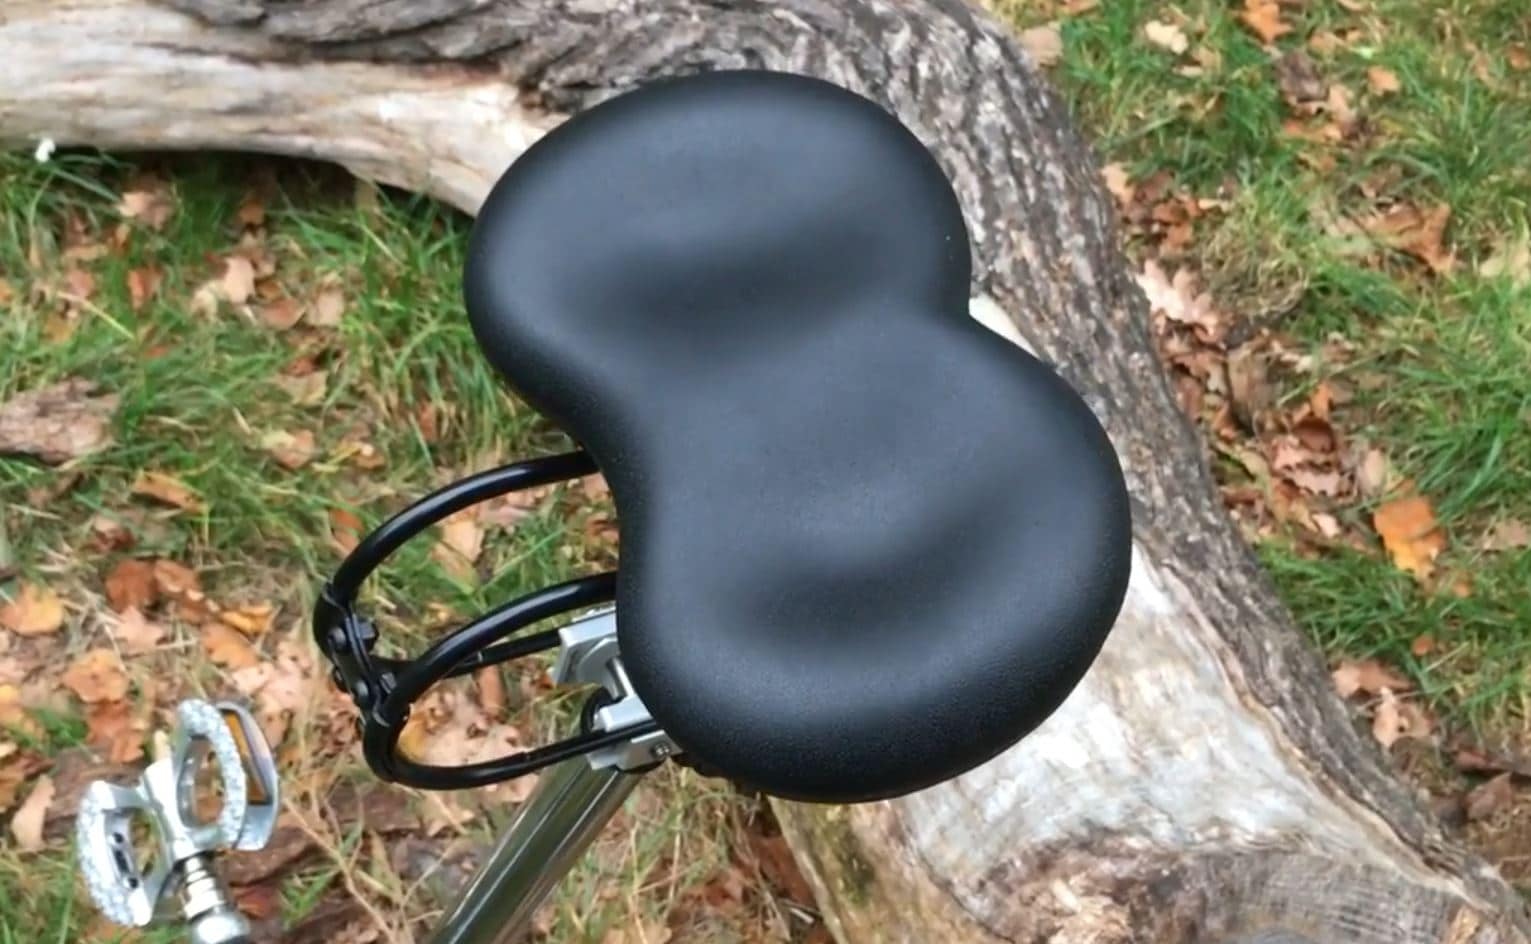
The Science Behind Noseless Bike Seats
Often people claim a lot of things and have no scientific evidence
behind them. I actually want to go down deeper on my words and explain
to you what I am suggesting. Hornless bike seats are different from
regular bike seats mainly by their appearance. They don’t have the horn
in front of the seat.
Imagine, you’re riding a bike for more than 3 hours a week. You can
have erectile dysfunction. Again, it is scientifically proven that bike
seat nose creates high pressure on your perineal area. Now, all humans
have a pudendal nerve on the frontal side of their pelvis. When you are
sitting on a regular bike seat, you are actually pressing your pubic
area against the seat. The pressure falls on the pudendal nerves and
pubic arch. It would be okay if the pressure stayed there only for a
short while. Constant biking increases the pressure and damages it.
There is no universal bike chain that would fit all types of bikes.
Bike chain sizes vary based on several factors. In my previous article, I
already have discussed the types of standard bike chains. Anyhow, I
thought that we need a separate article on bicycle chain sizes.
If you are replacing your bike chain by yourself, you need to be aware of the differences between bicycle chains.
In this article, we will be discussing different lengths and widths
of bike chains. We’ll also discover an equation for determining the
proper length of a standard bike chain, review a chart of bike chain
sizes, and finally, we’ll answer some of the burning questions.
So, let’s start with the bicycle chain size chart and size guide.
Bike Chain Size Variables
Link Lenght (Pitch)
The bike chain link pitch (distance between pin centers) is
standardized and equals 1/2 inch or 12.7 millimeters. Historically there
were also other pitch sizes, but the 0.5-inch pitch is standard these
days.
Length (Total Length)
The total length of the bike chain is calculated by multiplying the number of links with a 1/2 inch link pitch.
I have seen chains with 100 up to 126 links.
I analyzed a list of best-selling bike chains on Amazon and found out that the most popular chain length is 116 links.
You can always shorten your bike’s chain. But it is not easy to
increase the length of a bike chain. So, try to find an adequate size.
Internal Width
There are 4 sizes of the internal width of the bike chain – 1/8″, 3/32″, 11/128″, and 5/32″:
1/8″ (3.18 mm) – some of the bikes with a single rear sprocket
3/32″ (2.38 mm) – some of the bikes with a single rear sprocket, bikes with 5-8 rear sprockets, and derailleurs
11/128″ (2.18 mm) – bikes with 9-12 rear sprockets and derailleurs
5/32″ (4.0 mm) – freight bicycles and tricycles.
A simplistic way how to estimate your bike chain size:
If you have a heavy-duty cargo bike or tricycle, you need a 5/32″ chain.
If your bike is equipped with the derailleur, you need a 3/32″ or 11/128″ chain.
If you have a single-speed or internally geared bike, you need either 1/8″ or 3/32″.
You should get the correct size, but if it is impossible, you can use
the 1/8″ chain because it has limited compatibility with the 3/32″
sprocket.
External Width
When you are shopping for a new chain for your multi-speed derailleur
bike, the external width is another factor you should keep in mind. The
proper width is determined by the number of rear sprockets your bike
has – the more rear sprockets are spaced close together, the narrower
chain should be used.
The external width of the chain is not something you should worry about in the case of a single-speed or single rear cog bike.
If you're thinking about attending a
spinning class, you may be wondering what to wear. Spinning classes can be
intimidating if you aren't familiar with them, but with the right attire, they
can be a lot of fun.
In this blog post, we'll take a look
at some helpful tips on how to dress for your next spinning class. Keep reading
to learn more!
Spinning classes can be an enjoyable
way to get a great workout, but knowing what to wear can be a challenge. It’s
important to dress comfortably and appropriately for spinning classes in order
to get the most out of the workout. To help make sure you look and feel your
best during spinning class, here are a few potential problems and solutions.
·Uncomfortable
Shoes.
Solution: Wearing the right shoes is
important to ensure a safe and comfortable spinning experience. Choose a pair
of shoes that are lightweight and provide good support. Make sure they fit
securely and won’t slip off while pedaling.
·Poorly
Fitting Clothes.
Solution: Clothes that are too tight
or too loose can cause discomfort and distraction during a spinning class.
Choose clothes that fit well and allow plenty of room to move. Look for fabrics
that are breathable and moisture-wicking to keep you cool and dry.
·Too
Much Accessories.
Solution: Too much jewelry or
accessories can be distracting and hinder your movement. Avoid wearing anything
that could get tangled in the bike or interfere with your workout.
·Not
Wearing the Right Colors.
Solution: Wearing the right colors can
help you stay focused and motivated during a spinning class. Choose bright,
energizing colors that will help you get into a positive, driven mindset.
What to Wear to Spinning Class: A Guide to Outfitting
Yourself for Maximum Comfort and Style
Spinning, or indoor cycling, is an
increasingly popular form of fitness. Whether you’re just starting out or have
been a seasoned spinner for years, it’s important to dress for the class
appropriately. For maximum comfort and style, what you wear to spinning class can
make a huge difference.
Fabrics such as polyester, spandex,
and nylon are all excellent choices because they allow your body to breath,
wick away moisture, and keep you cool and comfortable throughout the class.
Additionally, look for garments that fit snugly but aren’t too tight, as this
can be constricting and make it difficult to move.
Make sure to wear shorts or pants
that won’t bunch or ride up during class. Finally, avoid wearing cotton since
it can absorb sweat and can make the class uncomfortable.
In addition to moisture-wicking clothing, you’ll also want to make sure you
have the proper footwear. Look for cycling shoes that are designed to be
lightweight and breathable. You’ll also want to make sure they have a stiff
sole and a secure closure system, as this will ensure that your feet stay in
place throughout the class.
Moreover, if you’re just starting
out, you may want to consider investing in a pair of cycling shorts or bibs.
These are designed with extra padding in key areas, which can help make your
ride more comfortable.
By taking the time to dress
appropriately for spinning class, you can ensure that you’re comfortable and
stylish throughout your ride. With the right clothing and footwear, you’ll be
able to enjoy your workout and look great at the same time.
Essential Spinning Gear: What You Need to Know Before You
Start Spinning
Spinning is a great way to stay fit and improve your fitness level. Before
you join a spinning class or begin spinning at home, there are some essential
pieces of gear you should know about.
Cycling clothing is an important
element of your spinning gear. Cycling shorts and tops are made for comfort and
breathability, and many also feature compression technology that helps improve
your performance.
Additionally, shoes are also
essential for spinning, as they clip into the pedals and help you stay in
control. The shoes should be lightweight, comfortable and provide good grip on
the pedals.
Lastly, you may want to consider
investing in a good quality spin bike. This will allow you to adjust the tension
and resistance, as well as the position of the saddle and handlebars, in order
to customize your ride.
Having the right gear for your
spinning class or indoor cycling session is essential. As it can maximize your
performance and make the most of your spinning experience.
Spinning Class Clothing: Choosing the Right Materials for
Maximum Performance
Natural fibers like cotton, bamboo,
and Merino wool are ideal as they offer good ventilation to keep you cool and
dry. Additionally, they are highly absorbent and can quickly wick away sweat,
allowing your body to stay at a comfortable temperature while you exercise. The
material should also be stretchy to allow for full range of motion and
flexibility.
Finally, it is important to choose
cycling clothing that is designed to fit the body snugly. Loose-fitting
clothing can be dangerous as it can get caught in the bicycle, so make sure to
opt for materials that allow for a close but comfortable fit. With the right
materials, you can maximize your performance during a spinning class and ensure
your safety.
The Benefits of Wearing Specialized Spinning Apparel
Wearing specialized spinning apparel
is the best way to maximize your experience and get the most out of your
workout. Specialized spinning apparel helps riders keep cool, dry and
comfortable, while also providing protection from sweat, dirt, and other
elements.
The most important benefit of wearing
specialized spinning apparel is that it helps with performance. With the right
fit and materials, riders can move freely and efficiently, allowing them to
focus on their form and technique, rather than their clothing.
Additionally, specialized cycling
clothing is designed with aerodynamic fabric and strategically placed panels to
reduce drag, helping riders’ power through their workouts with less effort.
Specialized cycling clothing is
designed to keep riders safe and comfortable, even when the temperature and
humidity levels are high. Many apparel pieces are made with breathable,
lightweight fabrics that are sweat-wicking and quick-drying, while some even
come with built-in reflective elements to improve visibility during low-light
conditions.
Finally, specialized spinning apparel
also helps to keep riders secure during strenuous workouts, with features such
as compression panels and secure pockets.
wearing specialized spinning apparel is one of the best ways to maximize your
performance and improve your overall cycling experience. Not only does it
provide comfort and protection, it also helps you to stay safe on the road and
power through your workouts with ease.
How to Choose the Right Sized Spinning shorts, Tops, and
Shoes
Choosing the right sized Spinning
shorts, Tops and Shoes is essential for your comfort and performance during an
indoor cycling class. Whether you’re a beginner or a seasoned pro, the right
size and fit are important to making sure that you can get the most out of your
workout. Spinning is a high-intensity, high-impact exercise, so having the
correct fit is essential for your comfort and safety.
When it comes to spinning shorts, you
want to look for something that is lightweight and breathable. Look for shorts
that fit snugly but allow for freedom of movement. The shorts should be the
right size for your waist, hips, and legs, and should not be too loose or too
tight. It’s also important to make sure that the shorts are not too long, as
this can interfere with your pedaling motion.
For tops, you want something that is
lightweight and breathable, but also offers some support and coverage. Look for
a top that is long enough to cover your lower abdomen, and that fits snugly but
not too tight. It should also allow for freedom of movement.
For shoes, make sure that they fit
snugly but not too tight, and that they offer enough arch support for your
feet. It’s also important to make sure that the shoes are not too loose, as
this can cause painful rubbing on your feet during a ride.
Conclusion
Spinning classes are a great way to
get in shape and have a good time. Wearing the right clothes can help make your
spinning class experience more enjoyable. Choose comfortable, breathable, and
lightweight fabrics that won’t get in your way as you move. Avoid anything too
baggy or tight, and make sure it’s comfortable enough to move in.
If you've ever had your bicycle pedal
fall off, you know how frustrating and inconvenient it can be. And, if you've
had a bike pedal fall off, you know how easy it is for the rest of the bike to
become misaligned and unresponsive.
In this blog post, we'll take a look
at how to fix a bike pedal that fell off and give you some tips on how to
prevent it from happening again. Keep reading to learn more.
How to Get a Bicycle Pedal Back on.
Maintaining your bicycle is important
in order to keep it in optimal working condition. One aspect that requires
regular maintenance is the bicycle pedals. Knowing how to get the bicycle pedal
back on properly is an important skill to have if you want to keep your bike
running smoothly.
The first step in getting your
bicycle pedal back on is to locate the spindle of the crank arm. This is the
metal rod that goes through the center of the crank arm and connects the pedal
to the bike. Once the spindle has been located, you will need to place the
pedal onto the spindle, ensuring that it is the correct one for your bike.
After the pedal is in place, you will
need to use a wrench to tighten the nut that holds the pedal in place. It is
important to make sure the nut is securely tightened in order to keep the pedal
in place.
Finally, you will need to check the
pedal for any wear or damage. If the pedal is damaged or worn, it may need to
be replaced. If no damage is found, then you can now enjoy riding your bike
with the new pedal in place.
Knowing how to properly install a
bicycle pedal is an important skill to have if you want to keep your bike
running in tip-top shape.
How to fix a bike pedal that has fallen off - step by step.
Fixing a bike pedal that has fallen
off can be quite a tricky task for someone who is not familiar with bicycle
maintenance. However, with the right tools and the instruction below, it is
possible to fix it in no time.
The first step is to make sure that
the bike is in a stable position and that you have all the necessary tools
ready. These include a pedal wrench, an open-end wrench and a hex key. Next,
you will need to remove the crank arm. This is done by unscrewing the crank arm
bolt with the pedal wrench.
Once that is done, you can take off
the old pedal and clean the threads. Make sure to check that the threads are
not damaged, if they are, you will need to get a replacement axle.
Finally, you can attach the new
pedal. Place the new axle into the crank arm, then insert the hex key into the
axle and start turning it clockwise. Once the axle is securely in place, you
can start using it.
It is essential to perform regular
maintenance on your bike's pedals to ensure the highest level of safety and
performance.
Reasons your bikes peddle may have fallen off.
Maintaining your bicycle is an
important part of owning one, and one of the most common maintenance issues is
when you find your bike pedal has fallen off. There are several reasons why
this could happen, from improper installation to wear and tear.
The first reason your bike pedal may have fallen off is because of improper
installation. When installing a new pedal, it is important to use the correct
tools and ensure it is correctly tightened. Not correctly tightening the pedal
can cause it to become loose and eventually fall off.
It is important take into account
that if you don’t use the correct type of grease when installing the pedal, it
can become loose and fall off.
The second reason your bike pedal may
have fallen off is due to wear and tear. Over time, the bearings inside the
pedal can become worn out or broken, causing the pedal to come loose and
eventually fall off.
Lastly, if you often ride in wet or
muddy conditions, the parts of the pedal can become corroded or rusted which
can cause it to come off.
By understanding the reasons why your
bike pedal has fallen off, you can take the necessary steps to prevent it from
happening again. This can include using the correct tools when installing the
pedal and using the correct type of grease.
Another pointer is you should check
the condition of the pedal regularly and replace any broken or worn-out parts.
Essential Tools for Replacing a Bike Pedal
Replacing a bike pedal is a job that
requires the right tools. Whether you're a seasoned bicycle maintenance pro or
just getting into the hobby, having the right tools to replace a bike pedal is
essential. Basic tools that are needed for a successful job include a pedal
wrench, a bottom bracket tool, and a crank arm tool.
The pedal wrench is designed to fit the 15mm pedal threads and a variety of
nuts and bolts. The bottom bracket tool is used to remove the crank arms from
the bottom bracket and is also used to remove the bearing cups.
The crank arm tool is used to remove
the crank arms from the bottom bracket. It is also important to have a good
quality bike grease and lube for the pedals and crank arms.
Moreover, having a pair of good
quality bike pedals is essential for the job. Pedals come in a variety of sizes
and styles, so it is important to choose the right pedals for your bicycle.
It is also important to make sure the
pedals are compatible with the crank arms and the bottom bracket. With the
right tools and parts, replacing a bike pedal is a relatively straightforward
process.
Conclusion
In conclusion, bicycle pedals are an
essential part of bicycle maintenance and should be given the same attention as
other parts of a bicycle. It's important to get the right size and type of
pedal for your bike, as a wrong size or type of pedal can lead to poor
efficiency, discomfort, and potential safety issues while riding. Bike pedals
are an integral part of bicycle maintenance and should not be overlooked.